
How to apply for an e-visa to visit India
We recently visited India as tourists and applied for an Indian e-visa. The process is relatively straightforward but there are some strict requirements that you must follow. We will put everything together here so its easy for you to follow as well show you an example of what an India eVisa looks like.
1: Check Your Eligibility
Not all countries are eligible for an Indian e-Visa. Visit the official website or this eligibility page to confirm. Eligible categories for e-Visa include:
- Tourist e-Visa (most common for casual travel)
- Business e-Visa
- Medical e-Visa
2. Prepare your documents
Before starting the application, gather the following:
Mandatory documents
- Copy of the first page of your passport (PDF format, max 300KB). Passport must be valid for at least 6 months from the date of arrival.
- A recent passport-sized (350x350 pixels minimum) photo (JPEG format, max 1MB). You must face the front against a clear background and have no shadows. We took a photo at home and edited it in an image editor to make it the correct size.
Optional documents (for some nationalities or extended stays):
- Travel itinerary
- Return flight ticket
- Hotel booking
3. Go to the Official e-Visa Website
Visit: https://indianvisaonline.gov.in/evisa/
Be cautious of scam or fake websites. Only use the official government portal ending in .gov.in.
4. Fill Out the Online Application
Click on “Apply here for e-visa” and complete the form with:
- Personal details (name, DOB, nationality, etc.)
- Passport details
- Travel information (arrival airport, date, etc.)
- Address in India
- Family professional information
- Previous visits to India (if any)
5: Upload Documents
- Upload the passport scan and photo
- Follow the format and size guidelines
- Double-check that the image is clear and legible
6: Payment of fee
Fees vary by country of citizenship and visa type. Our fee was $25 USD as travellers from the United Kingdom.
Payment methods: Credit/debit cards (Visa, MasterCard)
You’ll be redirected to a secure payment gateway.
Note: Keep a copy of the Payment ID and Application ID
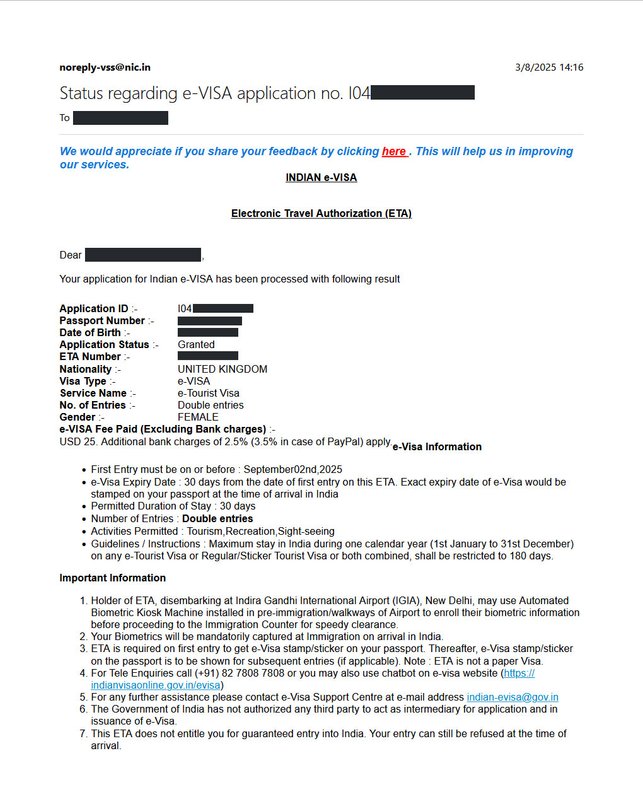
7. Wait for a decision
It usually takes 72 hours to get the visa, but we recommend applying at least 4-7 days before travel.
You’ll receive an email with your e-Visa PDF approval once granted
8. Print the e-Visa
Print the PDF e-Visa document and carry it with you when travelling outbound to India.
It should also be linked electronically to your passport.
9. Travel to India
At the airport you will have to show your eVisa print out to the check-in desk. At your arrival in India the immigration desk will also ask for it. Present them with your:
- Printed e-Visa
- Your passport (same one used in the application)
- You’ll receive a visa stamp on arrival.
Additional information
A tourist e-visa is valid for 30 days, 1 year, or 5 years (depending on which option you chose)
Multiple entries are usually allowed for longer durations
Do not overstay. You will be fined and possibly banned from future travel to India.
Avoid last-minute applications, especially during peak travel seasons.